Showing posts with label toys. Show all posts

Wednesday, September 21, 2011

flannel board! car table! spider art!

It was a creative day today. I finally completed E's flannel board along with lots of felt pieces to move around. My favorite is the tree.

My first attempt to transform the back of these book shelves into a flannel board was...lackluster.
I ripped everything off and started again.

Here's the finished flannel board!

The wavy green part along the bottom is actually a pocket.

I made a deeper pocket on the lower right side to store our recycled alphabet cards.
The "car table" is more accurately an inverted diapers.com box we do puzzles on. I glued some white paper down (to draw on) and then glued down some recycled cardboard coffee cup sleeves. E loves it! Eventually I'll make a more elaborate one on a bigger box. I've also got an idea to make a bunch of chutes and tunnels with paper towel tubes...I'll keep you posted.

E has a random collection of cars. I buy the wooden ones, but he has inherited plastic ones from family. He loves them all the same. And he was diggin' his new "street"!


This spider art came about because I'm trying to figure out what to do for E's birthday party. This was a proto-type I made with E today. He gave it the seal of toddler approval! Shh...don't tell his guests!


E's very own spider art!
Here's what you do:
Step 1:
Paint your canvas a solid color (I used acrylic craft paint on an 8x10 inch pre-primed canvas). Let dry.
Step 2: Draw, paint, or stamp your spider body. Remember - they have two body parts! Fangs and spinneret optional!
Step 3: Poke holes for legs by making 4 holes on each side of the head. I used a tapestry needle and wiggled it around to make sure the holes were large enough.
Step 4: Pre-cut leaf shapes out of tissue paper. Recycle unwanted gift tissue paper if possible. (Toddler could practice snipping and cutting shapes to use in background.)
Step 5: Help your toddler use a glue stick and spread glue on the background. Tap tissue paper leaves and shapes onto the glue. These leaves will help your spider camouflage.
Step 6: Pull each of 4 chenille stems (pipe cleaners) through the holes on either side of the spider to make the legs.

There you have it! Other suggestions might include: Glue sequins or buttons to the body for spots. Or try gluing silver thread from the spinneret to make the spider silk. Or use Elmer's glue and make a trail of spider silk by covering it with glitter. I'm not a big fan of google eyes, but you could add those as well.

This project is easily adaptable for ages 2-8. Please email me your pics if you try it!

Saturday, May 14, 2011

I spy kiddie art and custom graphic tees


Okay, so the photo could look more professional,
but you get the idea. Can you spy a wooden car?

I had a fun with my six-year-old niece recently while making our own "I Spy" game. We scavenged the house for her favorite objects and she arranged them in a pleasing way. Next, we photographed them. The photos can be printed at home and made into a personal "I Spy" game book. Other themes to photograph might be:

-utensils in the kitchen
-stuff to write with or write on
-bath toys and bathroom items
-seeds, leaves, and flower petals
-things from the recycle bin
-puzzle pieces
-favorite finger foods/snacks

This would also make a cute calendar or even holiday greeting card. If you've got your own version of these "I Spy" photos, I'd love to post them here! I may try my hand at these with my preschoolers if we find the time before the end of our school year. I know they could come out with some great outdoor I Spy photos!

Hand-printed Animal T's
I also wanted to share a recent t-shirt project I made for my son. I love the graphic tees from the Tea Collection and Mini Boden but they are so expensive! So I took inspiration from a couple of my son's picture books and made my own graphic tees for under $5 each.

I picked up a few cheap cotton t-shirts and washed them to make sure they were already shrunk. I put newspaper in between the front and back of each shirt to make sure my paint wouldn't go through.

Next, I drew animal designs onto a foam sheet from the craft store. If you want your stamps to have texture, just press hard on the foam with a ball point pen as you draw. You can see the detail in the printing where I used dots and short lines on the owl. Remember, when you are printing, your design is going to print in reverse.

I cut out the foam pieces and painted each piece with acrylic paint (you could use fabric paint here instead). When you apply the paint, keep in mind that if the paint is too thick, it will squish and spread out - potentially distorting your design. Also, your brush strokes in the paint may show up, which can be a good thing if you plan for it.

I carefully stamped each piece onto the shirt, pulled off the foam stamp, and let dry. I washed off my stamps while waiting for the paint to dry. It dries fairly quickly because the cotton tees are very absorbent. Now, I already had a whole alphabet stamp set to add text to my design, again, using acrylic paint. You could omit this if you just want to print a design.

Once the paint is dry on the tees, you can use a contrasting fabric marker to outline or add little details. And that's it - your own custom graphic tees, just as cute as the fancy shmancy ones!

Thursday, April 14, 2011

discovery jars


A friend of mine visited a Waldorf School in Baltimore recently and said that the children enjoyed dropping objects into tissue paper covered jars. The "ka-plink" sound is pleasing to them and the paper protects the glass. I think she said that the kids were dropping old wooden clothespins into the jars.

I didn't actually get to see the jars myself, but I thought this was a cool idea. I figured I could make my own!

I re-purposed these leftover Ball canning jars and a recycled sauce jar to make my version of "discovery jars". I had some handmade paper scraps that were thick and perfect for covering the glass. (Tissue paper or fabric would be lovely, too.) I used regular Elmer's Glue (not the washable kind) to seal the paper on the outside of the glass. On the bottoms of the jars, I cut and hot-glued felt just to make sure they wouldn't break when set on a hard surface.

These jars are great for sorting, grouping, and counting (all important math concepts for early learners). Given my toddler's obsession with lids, these jars are perfect! I made a few for my preschoolers as well. They can sort seeds, shells, stones - you name it.

And you know what else? Lots of grown-up uses, too. The jars would be beautiful with a tea light inside as a lantern or tied with a ribbon for a flower arrangement.

Sunday, April 3, 2011

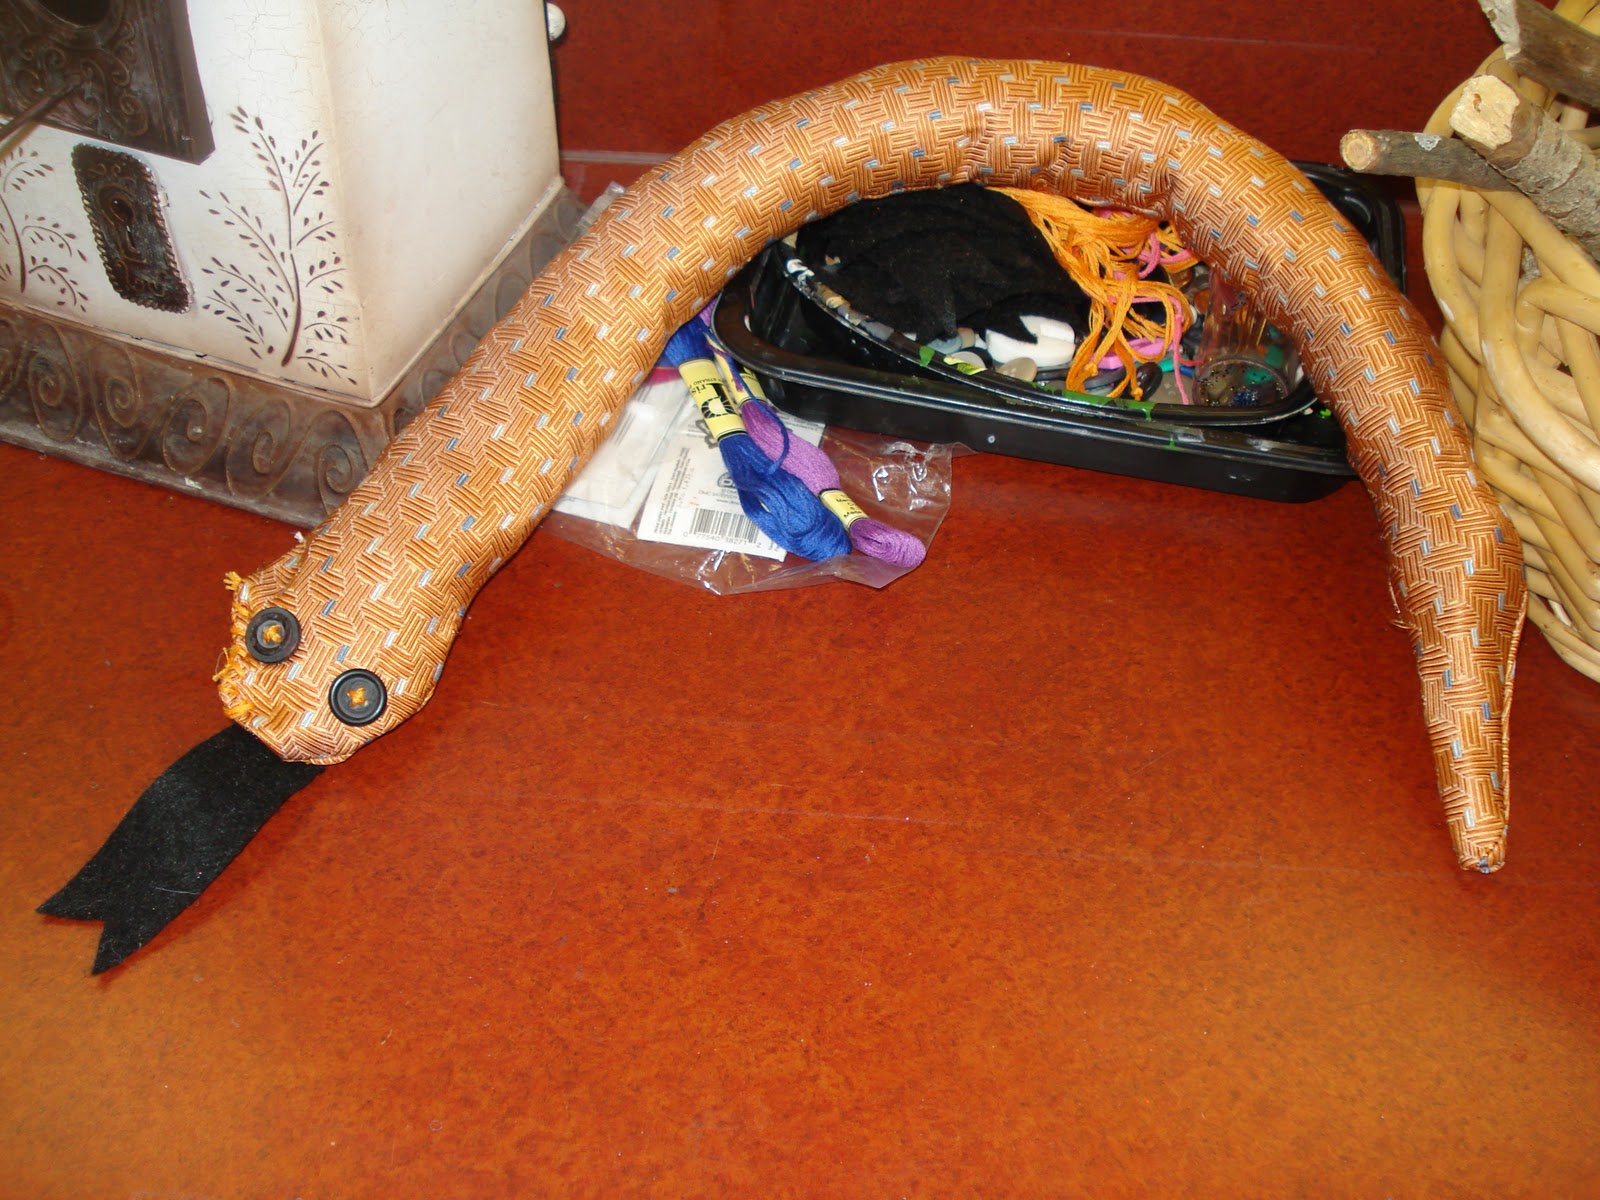
What do ugly neckties and snakes have in common?

Let's see...they both have eye-catching designs and each can be frightening upon an encounter, especially when around one's neck.

After some research on-line to find a clever snake-themed art project for my preschoolers, I came across a fabulous idea to sew a snake from re-purposed neckties. But to my dismay, I went to click on the instructions and the author wanted me to PAY for them! As if! So I thought, "I don't need no stinkin' directions! I'll figure it out myself!"

So here is my version of a snake necktie. And by all means, freely use my instructions!
STEP 1: Open up the seam of the necktie. Iron the seams so they are open and lay flat.
Remove the lining and set aside. (You may want to cut it up and use as stuffing.)

STEP 2: Fold the tie over so the ends touch. The "right" sides of tie should face each other.
The "wrong" sides of the tie should face out. Pin in place. Can you see where the snake is?

STEP 3: Sew the snake together, leaving an opening at one end for stuffing.
Cut off excess fabric and set aside.
(NOTE: If you don't trust yourself to freely sew the shape, draw an outline as part of Step 2.)

STEP 4: Use the opening to turn the snake inside-out.
Double-check your seams to make sure none are popping open.

STEP 5: Stuff the snake with old pillow stuffing, shredded paper, or fabric scraps.
This part is fun for the kids!
(NOTE: You may need a long stick or dowel rod to help push the stuffing down.)

STEP 6: Pin the opening closed. Thread large needle with embroidery floss. Help your child to stitch the opening closed. Let your child select buttons for eyes and cut out a felt tongue. Help her stitch them on as well. OPTIONAL: Use more buttons or sequins to sew on snake scales.

VOILA! Your snake is complete!
I should note that after sewing 20 of these, this seemed more like an adult project than one for my students!

But that said, I brought my sewing machine to class and the kids took turns sewing (with help, of course) to make a class snake. The children learned how a sewing machine works and believe me, they were mesmerized! They were very impressed when I pointed out the stitching on their clothing and told them this is how clothes are made before they go to stores for us to buy.

After the children participated in the sewing demonstration, they each selected a "snake". Several of the children had brought in ties from home which they used. We assisted the children as they stuffed and sewed the snakes over the course of a couple classes during their self-directed play time.

I really loved this activity - it was worth all the advance preparation!

Monday, March 7, 2011

stop to look at the flowers

I'm feverish. Spring feverish that is. And even though it was only about 45 degrees today, the sunshine beckoned me outdoors.

I took E for another wagon ride when something wonderful dawned on me: springtime will feel completely new to him. Last spring he was just months old, and now he's over 16 months and much more aware of his surroundings.

I stopped the wagon to point out some early purple crocuses when I saw it -- that incredible look of wonder and awe on his face -- when I excitedly said "look at the flowers! Spring is almost here! The flowers are ready to come up!" He scrambled to get out of the wagon for a closer look (and touch).

And so it hit me. I get to share spring with someone who has never known it before. In all its glory: rain, tree buds, bird songs, butterflies, and silky colorful petals, I get to share it all with him. Hurry up, spring!

Tuesday, March 1, 2011

our toy story...recyclables for baby

Does your kid go through the trash like a hungry raccoon? Or plead to play in the recycle bin?

Ain't it grand when you don't have to buy toys?!

I'm here to tell you there are many surprising (and obvious) ways for toddlers to enjoy recyclables - so long as mom and dad can get over thinking it's "trash". Here are some ideas that your little recycler may like to try:

Lids. My son has Lid-Mania, if that's possible. Cinnamon jar - cool flip top lid and also smells nice. Shampoo bottle - tiny flip top lid easy for tiny hands to twist. Yogurt lid - large snap on lid tough to pull off, and bonus, you can put things inside. Juice, milk, and soda tops - fun to shake and play with together, also fun to carry around as if they are precious coins.

Milk Jugs. Combine the love of "tricky" lids with a handle and VOILA! Perfection. Milk jugs are easy to carry around, shake, bang, etc. Fill one with rice, dried beans, or pasta and now you've got a music maker!
Toilet Paper Rolls. Ah yes. They can be looking glasses. Binoculars. Tunnels for lids. Giant wheels to roll. Things to stick inside other containers. Cut them into sections and they can be giant beads or cuff bracelets.

Mesh Produce Bags. These are great because your child can see through the bag but has to work at figuring out how to get objects out. Tots can practice putting things away. These make a great way to store all your special recyclables, too.

Newspaper. You can crinkle it! And you can...crinkle it! Yeah, that's pretty much the draw here. At least as a toddler. With some encouragement, you can crinkle it to fit inside of other containers or wad it up with tape to make a simple ball.

Air Pillows or Bubble Wrap in Packaging. These are fascinating and weird to a little kid. The air "pillows" can be used as just that - pillows for Teddy. Or you can gently puncture them and help your child squeeze the air out to see how it deflates. The bubble wrap can be snapped and popped. (Like you weren't already excited at the mere mention of bubble wrap!) For older kids, bubble wrap is great for art projects.

Egg Cartons. Hide things in it. Shake it. Open it up again. Hide things in it. Shake it...you get the picture?
E's very own "kitchenette" made by yours truly. It keeps him happy for now...


Cardboard Boxes. Now, this is more a project for you than him at first. But if you wrangle up some cardboard boxes and tape them together, you can configure your very own kitchen set. This can get very fancy but even a simple version like mine is a crowd pleaser. (Check out where I got the idea here.)

Do you have some other cool ways for toddlers to use recyclables? I'd love to hear your comments!

COMMON SENSE NOTE: Please, please supervise your child during playtime. Keep an eye out for choking hazards. Double-check for anything potentially dangerous before you let your tot play.

Yes, peas are delicious - and funny!

Yes, peas are delicious - and funny!
Our little guy at 15 months, February 2011.